


How To
How to Create a Paper Bag Stool Top | Thrifty Decorating Technique
By using torn paper scraps in a variety of earth tones, you can create a unique and affordable stool top. Here’s how.
By Yankee Magazine|Sep 17 2017|![]()
Coffee By Design | Portland, Maine
Photo Credit : Katherine Keenan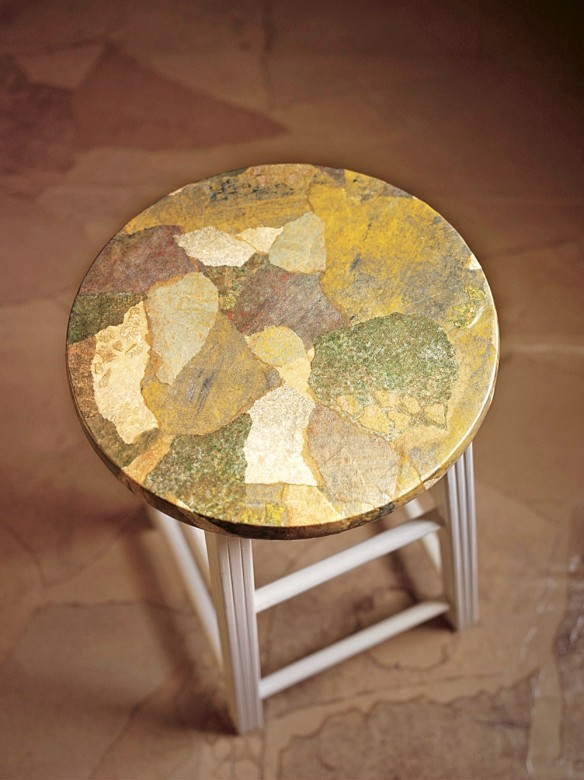
Photo Credit : Andrew Wellman
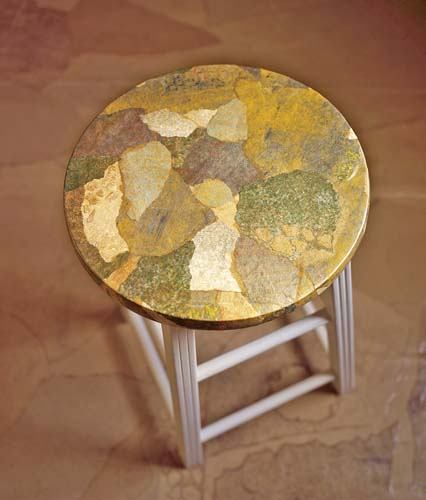
PAPER BAG STOOL TOP
PAPER BAG STOOL TOP | INSTRUCTIONS
Clean to stool surface thoroughly with soap and hot water. Sand any raised spots and fill any gaps with wood filler. Sand lightly again. For the stool in the photo, paper scraps in a variety of earth tones and torn in various sizes were used. Place larger pieces of paper first. Coat underside of each piece with a 50-50 mix of water and Elmer’s white glue. Lay smoothly on stool without overlap. Using a fine-bristle brush, give the stool a coat of Rust-Oleum’s Verathane Diamond Floor Finish, a type of polyurethane. Fill in the surface with smaller paper pieces, coated on the underside with the water-glue mix. Finish the whole top with one or two coats of the polyurethane. This post was first published in 2009 and has been updated.SEE MORE: How to Keep Squirrels Out of Bird Feeders | Simple Solutions New England Architecture | Guide to House Styles in New England How to Make Ice Candles | Winter Decorating Ideas


IS THE PAPER CUT IN PIECES LIKE A JIGSAW PUZZLE THEN PUT TOGETHER OR DO THE EDGES OVERLAP?
Wow…….I think this is a lovely way to cover anything, from a floor to a chair, stool, etc….very interesting! I;’d never attempt this, except it doesn’t appear difficult beyond doing…..I’m copying the instructions so I can attempt my hand at this lovely decorating skill…..many thanks !
Joann: This stool came into being from the scraps of acrylic painted paper left over from other projects, some of which were decades ago. The acrylics I love are iridescent Liquitex Acrylic artist colors because in natural sunlight they pick up light, glimmer and shimmer just as many natural stones do. You may also use any acrylic wall paint along with the iridescent, sponging, brushing, feathering, daubing, layering, stroking. Its much like fingerpainting, but the helpful thing is to hold in your mind what natural stones that you love look like and simply recreate them. Its best to do several different sheets of color and when you’re done start ripping! Lay them out first to get an idea of what it will look like. Then glue down pieces and fill in the holes, layer upon layer. Finally, Varathane! When I first begin I have a large piece of contractors paper and a surface on which to paint. I use plastic picnic plates to hold the paints as I add them and mix and blend. A sports bottle of water to squirt into the plate. Sea sponges, brushes, rags, feathers to add marbling & fractures. I add new color to the plate right in with the color I just used. Layer upon layer, bold color here, watered down wash there, feathered lines anywhere I feel, until it feels done. Toss it on the floor, grab a new piece of paper and a new palate of colors and here I go again! Its such fun! Its such a peaceful therapy! HA!