


Paper Bag Floor | DIY Instructions
Installing a brown paper bag floor is an attractive, inexpensive flooring solution for damp, drafty spaces. Here’s how!
By Ian Aldrich|Oct 01 2015|![]()
Coffee By Design | Portland, Maine
Photo Credit : Katherine KeenanTo insulate a drafty floor, a Vermont couple combined thrift and imagination by installing a paper bag floor.

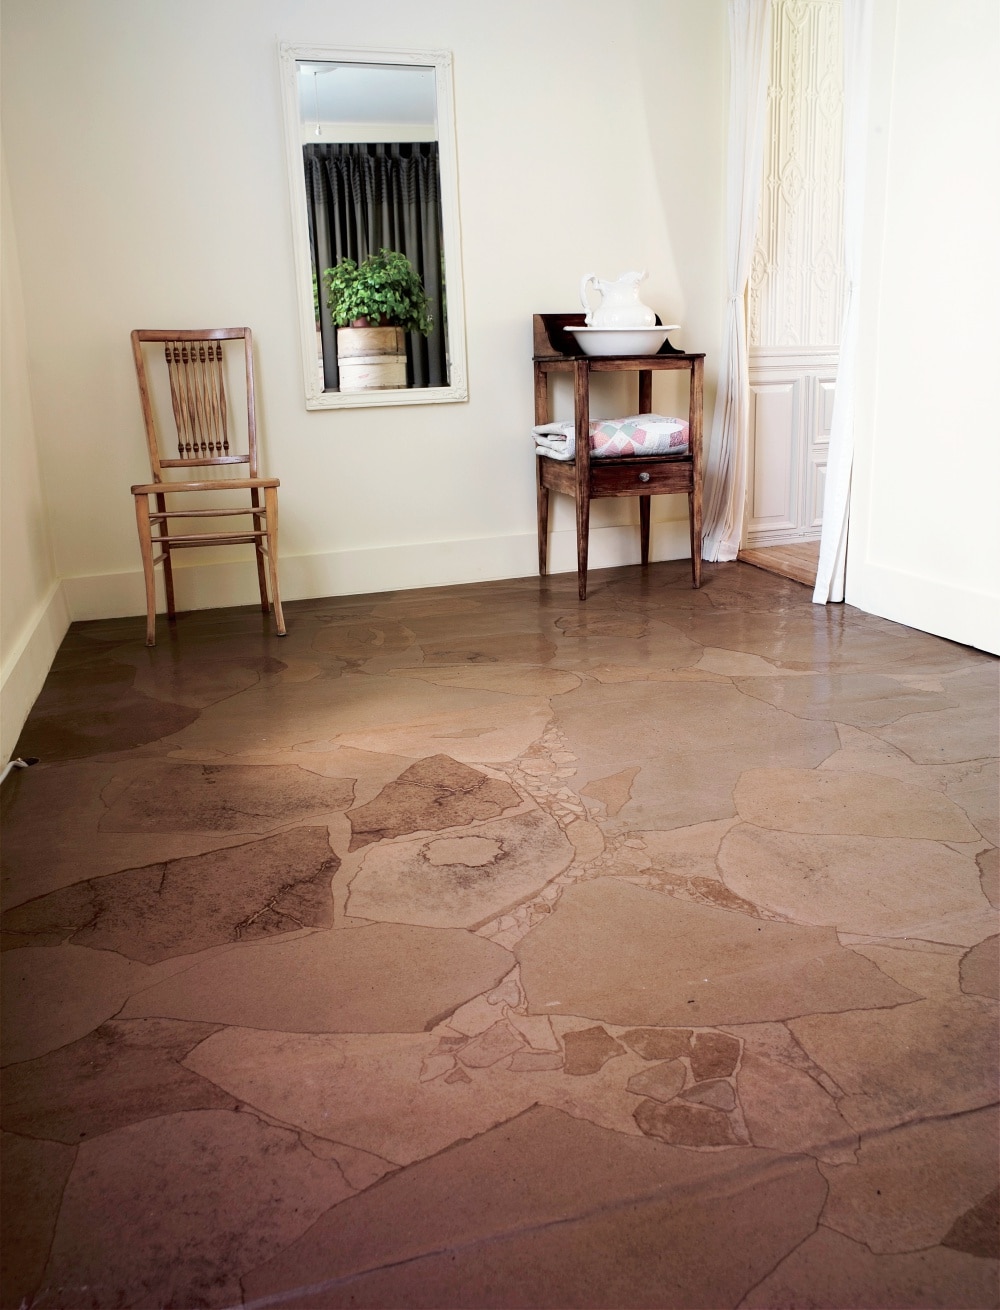
Photo Credit : Andrew Wellman
HOW TO DO A PAPER BAG FLOOR
When Gwynne Gardner and her husband, Michael Seitz, decided to turn a back room of their 1793 “honeymoon” Cape in Wilmington, Vermont, into a small guest area, they knew they had their work cut out for them. It was damp. It was drafty. And it had spiders. “The room gave me the creepy-crawlies,” says Gwynne.
Much of the problem lay with the pine-plank floor, whose cracks and gaps offered a perfect air channel from the stone-and-earth basement below. To address both the aesthetics problem and the lack of insulation, Gwynne turned to a technique she’d seen decades ago in a book: using torn pieces of paper bag as a floor finish. The result was a surface with a textured, rocky pattern. Even better: The room’s damp, drafty feel quickly vanished.
Photo Credit : Andrew Wellman
PAPER BAG FLOOR | INSTRUCTIONS
Gwynne and Michael cleaned the floor thoroughly with soap and hot water, then prepped it, sanding raised spots and packing the gaps between planks with wood filler. Another light sanding followed. Bypassing paper bags for heavier contractor’s paper (from a local hardware store), the couple then went at the main part of the work in two stages: bigger pieces first, followed by smaller additions.
Coating the underside of each piece with a 50-50 mix of water and Elmer’s white glue, Gwynne placed the larger “stones” strategically on the floorboards, being careful that each piece lay smooth without overlapping any other. Then for protection, Michael used a fine-bristled brush to give the floor a coat of Rust-Oleum’s Verathane Diamond Floor Finish, a type of polyurethane.
Gwynne “filled in the holes” with smaller paper pieces–a row of pebble stones here, creative fault lines there–before finishing the whole floor off with four more coats of Varathane. “The nice thing is you can take as long you want,” says Gwynne. “Even if you’re only partially done, you can still walk on it.”
What Do You Like Most About a Paper Bag Floor?
There’s the look and easy care (just mopping), but also the feel. “Walking on it in bare feet,” Gwynne says. “It’s very soft.”
Paper Bag Floor Cost? About $100, including brushes, contractor’s paper, glue, and polyurethane This project originally appeared in the January/February 2009 issue of Yankee.SEE MORE: “Paper Bag Floor” Stool Tops

Comments are closed.


I’d like to know if this floor is slick when wet?
i think it is a beautiful way to finish an old floor. i think i would like to try it.
This looks like a very interesting way to treat floors. But I have a question. Could this process be used directly on concrete floors as opposed to wood or plank flooring?
My husband is actually at the hardware store right now buying the supplies to do this project on a concrete floor. I will let you know how this works out. We’ve been trying to decide what treatment to do in our loft and I just am not a fan of staining concrete and we couldn’t afford to do hardwood. This project seems like a great compromise.
Does anyone know if this can be applied directly to concrete floors?
I covered an old floor in Alaska with this method, although much more simple & plain. Just ripped big pieces, nothing fancy. My daughter & teenage friends were in & out as they all are and the floor held up beautifully. Any time I noticed signs of wear, I simply cleaned the floor, mopped and applied another coat or two of Varathane (about once a year). Voila! Instant gloss! Yes, it can be applied to concrete and most likely anything you can think of. I covered a glue-lam beam in a new home (also in Alaska) with the acrylic paints applied to the paper first. Using irridescent paint, sponges, bird feathers (for fault lines) you can actually mimic mother nature. Folks were constantly asking how we got the rock so thin! HA! The only limitation to this useful and FUN medium is your own imagination. With small painted pieces, I covered a plastic candelabra trio which came out fantastic. My daughter reminded me that I papered a dresser as well. I don’t remember that one. Because it is so much fun, I will add a word of caution that came from my daughters: if you paper everything, it is no longer unique! All the best! love, gwynne
Hi! I notice in both photographs that the stones are varied shades of brown. Is that because the different pieces of cut out paper stones were painted different colors before they were glued down? Thanks very much!
Firstly, the “stones” are ripped, never cut. The variety of shades comes from either applying the glue to the topside, or the underside, of the paper (you’ll see what I mean as you roll the paper out and tear it – each stone piece will curl from being on the roll. You may glue either side, curl up or curl down, and each side reveals a slightly different shade of brown). Also, the amount of glue applied, and absorbed, causes darker shades of brown. The floor is brown paper only, no acrylics or paint of any kind. When you wish to add color to a project, the method I enjoy is to lay a sheet of plywood across sawhorses as your “table”. Roll out a large sheet of contractor’s paper, and bring out the paints! Use sea sponges, brushes, (your hands if you like!), feathers for marbling & fractures … anything at all that will help to create the shades of rocks & stones that always seem to catch your eye in nature. You may use wall acrylics in any color combo, but for the effects found in nature, nothing compares to the variety of iridescent Liquitex Acrylic artist colors. In natural sunlight the iridescents “catch” the light much the same as natural rock does. And these you layer with the other colors and are especially effective as fractures & marbling. All mix with water beautifully so you may use thick bold color or with water you may add more of a wash or anything in between. Just keep sponging, layering, daubing, stroking, shading, feathering, splashing. Remember fingerpainting? When you’re satisfied with that particular piece, toss it on the floor to dry, lay out another large piece of paper across your “table”, choose a different set of colors and make a new kind of stone. Do at least three separate kinds of stone, just as when you look in a creek you see many different kinds of stone & color. When you’re satisfied with your color scheme, start ripping & gluing. It is well worth the extra step & time & did I say FUN!?! Enjoy yourself. Take all the time you need. And step back and admire what you have created. love, gwynne
Both Michael and I would be happy to answer any questions about your project. Remember, we’re describing how “we” do it, but the joy is that each individual finds their own creative expression. So you may take the info and tweek and twirl it into your own version of how “YOU” do it! You may call (802) 464-9641 or email gwynnegardner@yahoo.com
This is beautiful! You have wonderful artistic talent, Gwynne! I love it! I might try this on an older cabinet that we have once our remodeling is done…thank you for the ideas and instructions!
What a cool way to re-finish a problem floor! This article was a revelation to me, as we need to remove our wall-to-wall carpeting in our upstairs bedroom due to dust mite allergies and when we checked underneath, we discovered that underneath lies the worst kind of rough subflooring possible. Covering it in this economical, easy way may be just the ticket for this family! Thanks Yankee!
How would you remove this finish, if you later want to change the floor ?
This sounds like just the project I need for my basement. Approximately what did it cost?
Do you think pre-pasted wallpaper would work on top of vinyl flooring in a bathroom? I was thinking of something like a marble pattern?
Eleanor: If you later want to change the floor, you may simply apply the new flooring over this paper floor. I wouldn’t consider attempting to remove it as there would really be no need. This technique improves an otherwise ordinary, uninteresting, or damaged floor. Paper is an amazing insulator and although it appears to have great texture, it remains smooth and level for new carpeting over it, or new wood flooring, or vinyl … whatever. Rebecca: Simply find out from your local dealers the cost of a roll of contractor’s paper, a gallon of white glue, a gallon of Varathane Diamond Floor Finish (water based). That’s your cost! Sally: I have no experience with pre-pasted wallpaper, but I do know that this technique has worked beautifully applied on top of old kitchen tile. I would get some sample pieces and try them out on the floor. I would want to make sure it adheres to the vinyl adequately before I covered the whole floor.
Would you like to see to what heights others have taken faux effects? (1) Take your time with this particular website. These two Floridians are AMAZING! The ideas that come bubbling up from viewing their work is worth the time you take to click on the links they offer including the “how to’s”:
http://www.trompe-l-oeil-art.com/
(2) Here Bonnye offers most of her trade secrets which, in reality, none of us has! HA! Her techniques can be used “as is” or incorporated into something else that you might create:
http://brownbagwalls.com/
(3) Sisters Hands is a consortium of women all across the nation, each with her own “faux” business, and oftentimes joining together in projects for various clients. Its worth it to click on each shadow figure and go to her particular website:
http://www.sistershands.com/
Well, if these don’t get your juices flowing, I don’t know what will! Enjoy! Take your time with your work. I mean really enjoy the process. It will mean so much more to you when you finally say, “It is done.”
All the best!
Love, Michael & Gwynne
This is fantastic, thank you Yankee, Michael, and Gwynne for sharing with us. I have an “asbestos tile over concrete” floor that needs to be changed – maybe I’ll give this a try, testing it on my foyer first! Thanks again.
This sounds like a great idea for our cabin floor which is currently “chipboard” painted with three coats of paint, but needing a smoother finish so the dog hair won’t get caught in the rough spots. Thanks for all your helpful additional comments!
Judy,
You need to have a professional contractor remove the asbestos tile. It is a #1 health hazard!!
As Yankee’s editor I am so pleased to see the discussion here. We are always on the lookout for home projects going on in New England. especially ones that highligtht that wonderful New England ingenuity. If anyone has a home project, or knows of a neighbor or friend whose project we should know about, be sure to let our “How’d They Do Thatr specialist know. His name is Ian Aldrich. You can reach him at iana@yankeepub.com.
I look forward to seeing your projects in this space–Mel
Leslie – Thanks for the “heads up”. I plan to put the new floor over the asbestos tiles, then they will be sealed in. Judi
I love this flooring option. Yours is beautiful! This sounds like the kind of project that I could really get into. I have a linoleum tile floor that needs to be removed (corners lifting and breaking off at this point) I’m thinking remove the old tiles so we are down to the subfloor. My room has radiant heating in the floor. Will this process work with that?
Coralie:
Absolutely! Once you’re down to the sub floor, make sure you’ve scraped all the glue & such to the degree that the paper will stick securely. I’ve sometimes prepped a surface to make it even – there are products at hardware stores that will do just that. The one I’ve used in the past was a powder that mixed with water and applied with a spatula. Nothing fancy and you don’t have to go overboard (unless you want to). The point here is that you always want a clean enough surface for a good adhesion. Once you have that, you’re ready to go!
All the best! love, gwynne
HOT TIP! Weldbond Glue. All of you DIYers check out their website weldbond.com. Michael and I are currently engaged in an outdoor project using paper, photos & acrylics on fiberglass. Since white glue doesn’t hold up well outdoors (especially in Vermont!) we found Weldbond Glue to not only be perfect for this project, but for an incredible variety of applications: as a glue, as a base coat primer, as a clear top coat, as a bonding agent, you name it! love, gwynne
I love this floor.I’ve been looking for something to use on my three season porch floor. This room is not heated and is the main entrance to the house. It may also on occation, have snow on it. Do you think it would work in this area?
Susan: I can only tell you that my floor in Alaska sustained a lot of snow, ice, mud & water that came in on everyone’s boots. And it held up beautifully with an added coat of Varathane applied each summer. If it were my porch, I would make certain that the wood was completely dry before beginning the project, and, yes, I would paper the floor. I’d use the Weldbond glue as I mentioned in a comment above in lieu of white glue, since Weldbond is waterproof/water resistant. And I would definitely glue down a stone without touching another, then apply a Varathane coat to seal and protect. This I would do for each piece secured to the floor for proper integrity. Think of a checkerboard, white squares and black squares, and apply your first layer of stones as though they were the white squares only, and make sure none of the stones touch one another. Once glued securely and dry, apply a coat of Varathane to each piece, not yet the entire floor, and let it dry overnight. Next day, fill in some of the spaces, again, making certain the new layer of pieces do not touch one another, let dry and coat each piece with Varathane. Continue this process until you reach a point where there are no spots of old floor exposed; all of the old floor has been covered in stone. At this point you may add smaller stones, creek beds, whatever your imagination allows, let dry, coat with Varathane. When you are satisfied with your new floor, in this particular case I would make certain there are no fewer than four coats of Varathane applied to the entire surface at once. Rule of thumb is that Varathane dries in about two hours, so the first day you apply it evenly to the entire surface, wait two hours and apply another coat. Let that dry overnight and apply two more coats the next day or any time thereafter. I would add another coat or two to ensure its stability during the winter. I can tell you that my husband has made a house sign as well as a road sign, completing both with several layers of Varathane. The sign has been hanging in Vermont weather, -30 and such, for many years and still looks as beautiful as day one. The road sign has been up since last summer and looks gorgeous today. I have no reason to believe it will not stand up to the weather as well as our house sign has done! All the best in your special project! love, gwynne
Gwynne:The floor is treated plywood, besides filling the gapes, does the floor have to be sanded? Thank You,Susan
Susan: Once you fill in the cracks, yes, sanding is the next step. The only thing you’re wanting here is to make certain the pieces glue down well. Imperfections will show up in the stones in a very interesting way, so its not important to make it glass, just that each stone should affix in a solid way. We’ve found with the Weldbond that you can actually fill in the imperfections with a thick coat of it, then apply the stones (with a coat of glue on the back) and put the two together. The Weldbond glue, once completely dry, makes a wonderful impervious adhesion. The floor that is shown on this page suffered a crack alongside a board that moved. The white glue let it separate cleanly, so we simply filled the gap with Weldbond, and created a little creekbed that will continually allow for repair as this ol’ house continues to shift and move. Its the beauty of this flooring, any damage is simply no matter. Just apply new stones in a new view, Varathane the entire floor, and presto chango! Another aspect or attribute revealed itself! HA! Have fun! Take your time. Enjoy the process. You’ll be glad you did. love, gwynne
Can I use this technique on chipboard? Do I need to sand the chipboard? Should I use the white glue as you did or the Weldbond? This seems like a great alternative to the other high cost options out there for flooring. I am so excited to try this and am just a wanting some pointers and tips so that I end up with great results such as yours.Thanks, KIM
Thanks to all of you who have “figured out” that I seldom check this article anymore. And I love it that so many of you have jumped in to your projects, having so much fun doing so. I don’t ignore anyone and welcome your wonderful email inquiries! All the best! love, gwynne
I did this on both inside Gabel
walls in my house. It tide in with the fur beams, and shiplap pine very well.
I wrinkled paper first, then applied wall paper paste, stuck paper pieces on wall. then brushed more paste over to finish. Looks like leather.
Fun & easy. Except use WellBond glue, not Elmers. My painted and unpainted “rocks” looked fine (over chipboard) when I glued it down, even the next morning. The minute I applied the Varathane, thought, parts of it lifted and it all looked very wrinkled. Had to slit the “bubbles”, apply more glue, wait til it was really dry and completely secured down. Then applied the remaining Varathane coats. Beautiful. For photos of my floor that was mixture of painted and unpainted, email me at donnermaine@earthlink.net
Thanks Gwynne for coming to my rescue on a Sunday morning!
Greetings All! Thanks to all the emails and photos of your beautiful projects. Each of you have created a space that is unique, useful and transformative. Michael & I have received many calls and emails to which we respond that changed our preferences. So, I thought I should include them here (for those who have read ALL the way to the bottom! HA!) WELDBOND glue is our #1 choice. Poor Elmer’s has been put on the back shelf! The Weldbond does such a fabulous job of adhesion and surface protection, that I coat the bottom (to adhere to the surface), put the piece in place, and add more Weldbond to the top surface. I use my hands mostly, which I must wash every now and then or the glue begins to peel off my hands onto the floor (yikes!). The pieces lay down perfectly! And I no longer brush on a coat of Varathane over each piece to protect it from dirt & debris, as the Weldbond serves the same purpose. When you’re done with the entire surface, THEN you brush on four coats of Varathane (letting them dry according to the label). I no longer need to make certain each piece doesn’t overlap (on the first layer – for adhesion integrity purposes) as, again, the Weldbond provides the perfect “sticking integrity” – almost no matter what you do! How good is that? Many still have the bubbles issue, but we’re hearing much less of that, too, when folks use Weldbond in lieu of Elmer’s. A young woman in Washington state has discovered a variety of other papers as opposed to the contractor’s paper. She’s not only used the usual brown, but is now covering other areas with a beautiful gray paper (“Bogus” paper, I believe she called it) from recycled materials. She also crumples the paper first and is creating a magnificent floor! I love to hear that something so “contagious” happens to be a GOOD thing! All the best! love, gwynne
Gwynne — Thank you for checking in and sharing your latest tips with us! It’s wonderful to hear from you.
After removing the carpets do I need to sand the plywood subfloor? I love the look and can’t wait to get started; I will wait for your answer. Thank you
Well, sadly I could’nt get the brands you listed. So I will have to go with the Elmers glue and a diffrent Varathane Lowes had. But,DID you mean to layer the Stones between the Varathane before the final 4 coats? I was a little confused on that part . I will be starting tomorrow. I laid 3 new plywood boards today over the floor.
Hi.. This sounds great!! I was wondering if I could usethis method to do my wore out counter tops? Would it hold up to heat and cuts? Any input anyone??? Thanks, Nena
I would like to do your brown bag fiaux fiinish on a 576 square foot floor and the cathedral ceiling. i would like to use the Weldbond glue as the floor is a problem old concrete floor. Where could I get Weldbond glue by the 5 gallon bucket at wholesale price?
Thanks so much for posting this. I’d been looking for instructions off and on for a couple of years, since I saw a paper bag floor on one of the TV remodeling shows. I have brown builder’s paper, a lot of bogus paper (because the only place I could find it was in 10-roll lots), and Weldbond. I sealed the floor today with a mixture of 1 part Weldbond to 5 parts water per Weldbond instructions and can hardly wait to start. However, I have to wait as tomorrow is a work day and I leave Weds morning for a conference. I have tried the Weldbond, however, as a sealant on the bathroom walls I just covered with vintage book pages. It gave a nice soft gloss finish and was great to work with. Would you suggest High Gloss or Satin Varethane?
Thanks, Phyllis
if you use the welbond do you still have to use the polyurethane? thank you, Martha
Love it! I just did this in my powder room and it looks AMAZING! I stained it with Jacobean oil based stain before the Varathane poly and it blows me away each time I go in there. We’re tearing out all the carpet and doing the entire house this way. You can see my step by step (plus all my mistakes) at my blog. http://mossisawesome.wordpress.com/2011/08/29/stained-paper-floor-awesomeness-under-30-diy-hardwoodlaminate-floor-alternative/
This is awesome. Thoughts for using his technique are tumbling through my brain… wallpaper, shopping bags in different colors, on the floor, on the wall, on the counter, creating artwork and more. Thanks! Love the stain idea!
What is bogus paper?
What a neat idea. Think I may just try it on the floor in my cabin.
I’m thinking of trying this in a small bedroom. Is this product appropriate for a bathroom or kitchen which can be quite wet and/or humid? What are the preferred cleaning methods once the product is installed?
Love this idea! I’m gearing up to do it in my house too! One question: Do you dilute the weldbond glue as you did dilute the Elmers to 50/50 ratio?
I did my high-traffic family room floor about 7 years ago. I used elmer’s glue/water, crumpled the pieces, and dipped them. If you add acrylic paint to the elmer’s/water mixture, you can add color to the paper. Several coats of poly….almost indestructable flooring. My floor design has a colored paper medallion in the center,I used paper tape painted gold to surround it.It looks like a stone/leather CASTLE floor, as one friend said. Didn’t know about well-bond glue..just went with what I thought would work!!
I am in love with this flooring concept!!! I am attempting a “sample” floor so that I can work out the kinks before I do the real thing. I am having issues with those darn bubbles. Lowes apparently doesn’t carry the Weldbond, and it looks like Home Depot carries two different WeldBond Contact Cement, but nothing about glue. Are you using the contact cement? or does WeldBond actually make a glue? Also, when the paper is laid down, it seems to wrinkle, is this expected? If not, how do I prevent those as well?
I bought WeldBond Glue through Ace Hardware. They had to order it and it was delivered to my local store, in about a week if I remember correctly. I have been thinking about doing this for over a year, and just today jumped in and pulled up my old floor tiles in the bathroom. Just need to finish the clean up and will start throwing down glue and pieces of paper. I’ll post how it’s going once I have a feel for it
I have my floor almost done. I have not varnished yet, but the Weldbond seals the paper. We have been walking on the floor. I also dropped silicon tub sealer on it and had no problems cleaning it up, even after the silicon was partially dry. I had a few wrinkles form. I found that the wrinkles appeared where the was a lack of glue on the bottom side of the paper. Dipping the paper in watered down glue worked best for me. I did the floor in sections so I could reach and make sure the paper was drying flat. I smoothed areas if wrinkles appeared. If they didn’t smooth out, I pulled the paper up, slapped on more glue and put it back down. Love the way it is turning out.
I did this over painted concrete floors with several coats of oil based poly which yellowed badly. I used glue/water mixture and found if i left the paper in the glue mixture too long it would cause the wrinkles.
http://www.roomzaar.com/rate-my-space/Other-Spaces/Brown-bag-floor/detail.esi?oid=29146677
I have enjoyed reading this thread, and am about to order the Weldbond, but did not know if the Weldbond gets dilluted just like the Elmers? I would appreciate any input. Thanks!
I was wondering if you have pics. we are wanting to do our basement which is cement. the rug is gone but not the glue yet. I would like to see the design you did. It sounds easier how you describe just putting the crumpled paper in a bowl . But did you use butcher paper and just any color paint? can you recommend any more sights to look at for help in how to do this inexpensive flooring? It sound to good to be true.
Yes, we just did it and it is awesome. 🙂
I absolutely LOVE this idea!!! I’ve actually done this to a bathroom wall in the townhome we used to live in & on a dining room wall as well. In the dining room, I left it the natural brown color with a satin clear coat (well, SEVERAL coats actually ha ha) over it. It was so beautiful…looked like leather. I even had a few people ask if we’d pasted leather to our wall !! (ha ha) On the bathroom wall however, I painted the brown paper a taupe color for a basecoat before doing any tearing. Once that was dry, I tore the paper into pieces & then wadded each piece up into a ball & threw it into a box to sit overnight. The next morning, I took the pieces out & smoothed them out & was excited at the beautiful wrinkles in the pieces. I then pasted them to my bathroom wall with a 50/50 mixture of water & Elmer’s glue. Once that dried, I coated it with a very thin coat of polyurethane which I lightly sanded & wiped down with a damp rag. Then I mixed a beautiful olive green colored satin paint with a tad of water & a bunch of clear metallic glaze in a bucket which I applied to the wall in 3ft X 3ft sections & then wiped off in a circular/cross hatched sort of pattern. I must say that it was FAB-U-LOUS! The green metallic glaze was so beautiful over the taupe base….& the olive glaze soaked & darkened the edges of the torn pieces so it looked slightly marbled. The landlady saw it & begged me to do it to a couple of walls in her other rental homes, but didn’t want to pay me…she said she’d DISCOUNT my rent a hundred dollars. HA! I actually laughed out loud before I collected myself & told her that it was a very tedious project (not really that bad in actuality ) & also an expensive one as well so, needless to say, I didn’t do her walls for her. hee hee hee! But, if any of you have the time & patience, it really has a beautiful outcome. A friend of mine who also does a lot of faux finishing saw it & said that it looked a bit like Venetian Plaster to her. Anyway, so thank you so so very much for sharing with all of us the wonderful ideas & projects you’ve shared. I love them all!! God Bless!!
LOL, i am pretty sure that and non-carpet floor is slick when it’s wet!
Do I have to take up the vinyl foor frist or can I put this on to of the vinyl?
Hi Shannon,
While you may be able to lay it on vinyl, we recommend applying it on top of a solid surface — concrete or plywood – for durability. Good luck!
Can I apply this paper floor technique over old Italian tile?
For best results, this paper flooring should only be applied over an even, solid surface.
I would use caution on a cement floor. Moisture could become a concern if a under pad isn’t utilized. Especially in a basement.
I’m thinking about doing this in my apartment. The old linoleum covering my living room and kitchen are in desperate need of removal. Money is definitely an issue for me and I would love an inexpensive option that is visually appealing. I see this was originally posted almost five years ago so I’m hoping to hear how the floor is still holding up. I live alone so foot traffic isn’t great but I do have a small inside dog. I would love to do this but only if it holds up to the years!
How does it hold up to pets who have accidents occasionally??
That is absolutely gorgeous! I wish I were so crafty as to think up these things…You did a marvelous job!
Apparently you can use this on concrete,..but it must be sealed with an appropriate vapour seal product. concrete primer or even a polyeurathane product will work i think. People have done this before.
I am thinking of doing this. I have a condo with no basement. It is directly on a slab. If I remove the carpeting and put this onto the concrete do you think it will be enough insulation. I live in new england.
Where do you find the gray paper? I looked at Home Depot and all they had was the regular brown.
I saw a tutorial on how to do this on concrete. If it works, here’s a link for you.
http://www.domesticimperfection.com/2013/03/paper-bag-floors-a-tutorial/
Me and my wife are thinking of doing this also, I was just wondering can this type of flooring be moped??
I have seen this done on walls years ago. Not too sure about a floor.
We have Allure plank vinyl floors. My floors look terrible because they have worn thru in many places leaving white and black spots everywhere where the surface color has worn thru to the rubber backing. I would like to use this technique over them. Does anyone know If I use Weldbond, will it adhere to this surface better than Elmers? Also if I use Weldbond will it seal the paper so much that I can’t stain it? Thank you for your time in advance.
Yes it can be applied to concrete floors,BUT you must first seal the floor.
Hello I have a question. I did this to a bedroom/bathroom floor – I love it.. but, have a small issue.. The base floor was concrete. All went smoothly.. I used a water based polyurethane – probably 5 coats. Now, when we walk on the floor, with rubber soled shoes, we make that awful squeaky sound. What did I do wrong? help! thank you!
I actually did this and I love the final results. I however had several challenges, which required me to repaper 3 different times. It was definitely a learning experience and I sure wish I had known some of the things before I started. 🙂 I actually wrote a blog about my experience in case anyone else is thinking about doing this. I learned a few good lessons. http://apurposefulpath.blogspot.com/2014/03/my-first-paper-bag-floor-test-and-learn.html
Enjoy!
I’m planning on using paper on “OSB tiles” (I cut OSB into 2X2 squares). I’m going to paper them individually then install them like hardwood flooring. I would like to paint each square (make a checker pattern). I’m wondering if you’ve head of anyone putting die in the water/glue mix?
This is such a wonderful idea, for so many reasons–cost, the ability to have an individual and unique project, and all the help and advice from people sharing their experiences. I can’t wait to be rid of the carpeting—so hard to clean, and maintain.
I have large areas to do, and the fact that you can relax and do the project as time permits is a great advantage. I have read through these comments three times, and am looking at all the recommended information and ideas—when I begin, I feel I will have good references to revisit and feel confident that I can do a good job and be pleased.
Thanks to all for the sharing–it is very encouraging . Off to measure and make my list of products!!
Hi,
I have seen other DIY projects like this and can’t wait to try it because my carpet is disgusting (from my pets) and I can’t afford to put in wood floors, which I need since I have pets.
I saw on another site how someone made their floor look like wood planks using paper. Since I don’t want to take the time to paint the paper and then stain it, I was wondering if wood grain wrapping paper would work or if it’s too hard to stick down with the glue. I found that Paper Mart sells it in large quantities. I want to save time and money by doing this. I also have limited mobility and feel that having the “wood look” already printed on the paper would be so much easier for me. Thanks for any advise you can give me.
Hi Jacqueline,
We don’t have any experience with that at Yankee, but perhaps one of our readers can chime in on your question.
Good luck!
Was thinking about this technique for a kitchen countertop. Do you think it would work if the counter was sanded down fairly well?
Thank you for your reply, Brenda. I hope someone will see my post and respond. I want to get started right away, but don’t want to use the wrapping paper unless I hear if anyone knows it would work.
Thanks
is this ok to put in a cement flooring ?
My floor is tonque & groove, but it was weathered before roof went on, so there are gaps & uneven, would this method of paper bag floor work on it…time to do something economical to my floor.
Get a square tile of vinyl 12 x12″ and test it out. Might need to pull up the vinyl and put it on the subflooring. Years ago I painted a bathroom floor cream and then sponge 3 shades of blue, then my husband coated with polyurethane to seal it. It’s held for 25 years.
Is it okay to paint brown paper with any type of acrylic paint for color? When using brown paper bag to cover eliminated wood furniture or cabinets, what kind of glue should I use to mix with water to paste down on furniture or cabinets before I go over it with polyurethane?
What kind of glue should i use to mix with water to paste down onlaminated
Wood furniture?
Clever, but I just don’t like it.
I used the lightest stain Lowe’s carries and the floor dried very dark. When I applied the first coat of poly, there were several areas that turned a beautiful golden color. Is there anyway to lighten the floor once the stain has dried? I’d love to have the entire floor that rich golden color. Thanks for your help and I look forward to hearing back from you. Kat
Hello;
I am thinking of painting a bathroom and kitchen floor (both vinyl), and am doing some research on how to go about it, and how it may hold up. I see on your comment that yours has held up for 25 years! Is your flooring vinyl? The research I find that painting vinyl floor is a short term outcome – so I would much like to hear more about your project. Thank you in advance for your response. Best Kate
whats so funny?