


String Easter Eggs | Easy Easter Craft
Looking for a fun and easy Easter craft? Bring bright color to your home with simple, inexpensive string Easter eggs.
By Caroline Woodward|Mar 30 2021|![]()
Coffee By Design | Portland, Maine
Photo Credit : Katherine Keenan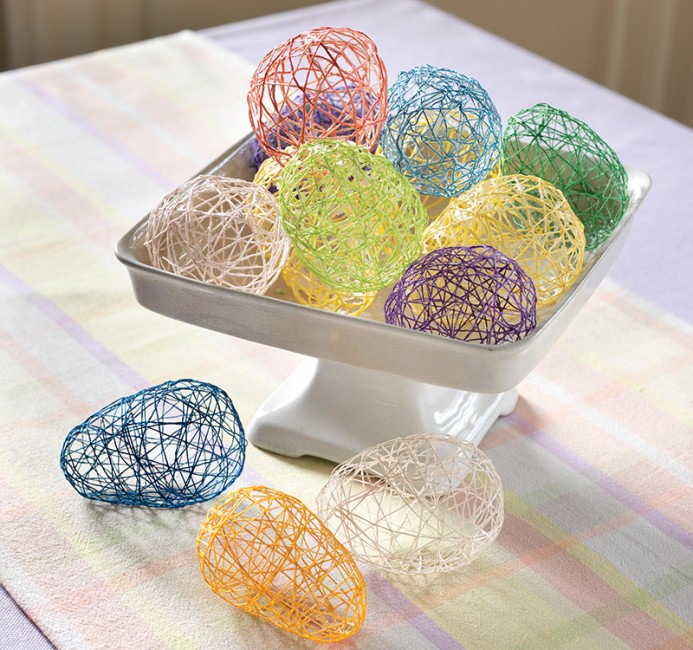
Photo Credit : Nat Rea
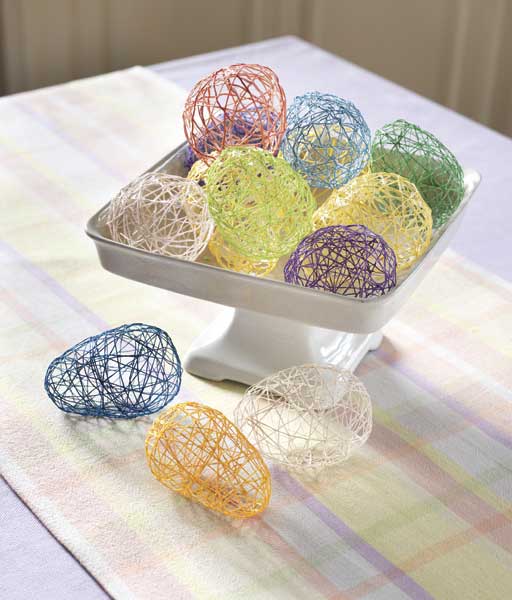
This string Easter eggs project uses homemade wheat paste — a lightweight, yet sturdy medium that holds the eggs together, and the same glue used to hang circus posters back in the day — as well as colorful embroidery floss, which you can find at almost any craft store. The process does get messy, so get your workspace ready to withstand the goop; well-placed kraft paper is key. (Don’t use newspaper, which will bleed ink when it gets wet.) You’ll also want to have plenty of rags available for wiping your hands. The good news, though, is that the whole thing cleans up easily with water.
Once they’ve dried, you can use the string Easter eggs to fill glass vases or bowls, or you might want to dangle them from some branches in a vase. (Just don’t hang them up outside; they’ll likely soften and fall apart if it rains.) It’s a fun and festive way to invite spring color inside.
Materials for Making String Easter Eggs
- large sheets of kraft paper
- 4 cups water
- medium-sized saucepan
- whisk
- 1 cup all-purpose flour
- medium-sized bowl
- small balloons
- embroidery floss, 2-4 skeins per egg (colors of your choice)
- scissors
- pushpins or clothespins
Instructions for Making String Easter Eggs
STEP 1: Cover your workspace with sheets of kraft paper. STEP 2: Make your wheat paste: Put the water in the saucepan and whisk in the flour, stirring until the mixture is smooth. Turn the heat to medium-high and cook, stirring, until the mixture begins to thicken and bubble. Remove from the heat. The paste will continue to thicken as it cools. Transfer the paste to a bowl, and set aside until it’s cool enough to touch. (At this point, the paste will keep, covered, for two to three days in your refrigerator.) STEP 3: Blow up the balloons to about 2 to 3 inches in length; tie them off, and set aside. STEP 4: Cut the embroidery floss into 3- to 4-foot lengths. Look closely at each piece of floss: Notice that it’s made up of six thinner threads twisted together. Separate each length of floss in half, so that from one strand you now have two, each one made up of three threads. You’ll use one of these thinner (three-thread) strands for each egg. STEP 5: Gently coil one three-thread strand into the glue, dunk to coat, and then remove, being careful to avoid knotting it. Wipe off the excess with your fingers. This part can get messy, but you want the strand to have just enough paste to coat well; using too much will cause the strand to stick to the balloon.
Photo Credit : Rea, Nat

Photo Credit : Rea, Nat

Photo Credit : Rea, Nat
See More Easter Crafts & Recipes: Italian Easter Bread Recipe Greek Easter Bread Recipe Coloring Easter Eggs with Homemade Egg Dye


Many years ago, I made a large Easter egg “basket” using a similar technique! The only difference was I used a large balloon, and a thin mixture of Elmer’s glue and water. I left a rough opening, which I trimmed with rick-rack once the egg was dry. I placed Easter grass in the bottom and filled it with candies and small toys as one would a regular basket!
Many years ago, made with a large balloon leaving open area at the tied end of balloon. When popped placed the grass inside, little bunnies, creating a landscape. Used tuna fish can covered with ribbon to perch egg on.
Balloon deflated before string was dry- I had hung them outside to dry. Live in Louisiana, too humid perhaps? Granddaughters so disappointed. Me too.
I’ve seen other projects that mix equal parts water and flour, without cooking it. Have you tried that? I was just wondering if I could skip the stove top part.
Have used laundry starch years back. It seemed to last well. Don’t remember if we had to cook it or not or just dissolved in warm/hot water.
I made these years ago, and am still using them. I store them in a shoe box during the year.