How To
Cookie Portraits | Edible Art
Here is a craft project that is absolutely foolish (in a good way) and will bring a smile to anyone who receives it. It’s a cookie portrait — a silhouette portrait turned into cookie art! For the purposes of this blog I chose to make an Elvis portrait because he is easily recognized by a […]
By Bonnie Thomas|Aug 25 2014|![]()

Coffee By Design | Portland, Maine
Photo Credit : Katherine KeenanPhoto Credit : Bonnie Thomas
Materials for Cookie Portraits:
- A black and white silhouette portrait printed onto 8″ x 11″ paper. Use your favorite search engine to search for “famous person’s name” + “silhouette”, i.e. “Elvis silhouette.” Print the image. If the image does not fill your paper you can scale the image to fit your paper.
- Cookie dough (recipe below)
- A cookie sheet pan
- An oven
- Parchment paper
- Masking tape
- A toothpick or butter knife
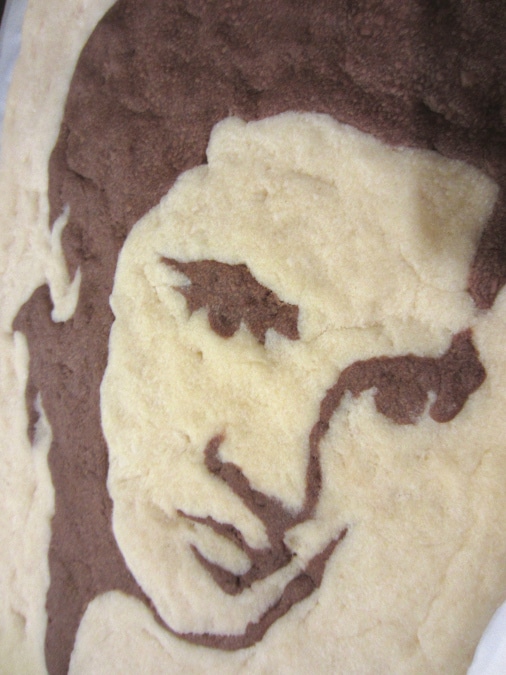
Photo Credit : Bonnie Thomas
Dough for Cookie Portraits:
- 1 1/2 cups of powdered sugar
- 1 1/4 cups of butter (this equals 2 1/2 sticks of butter)
- 1 egg
- 3 cups flour
- 1/4 tsp. of salt
- (1/4 cup of cocoa which will be added later)
Directions for Making Cookie Portraits:
- Make the cookie dough as noted above and chill it for 2 hours before using.
- Cut a piece of parchment paper to fit the size of your cookie sheet pan. Lay the parchment paper in the pan.
- Slide the silhouette picture UNDER the parchment paper so that you can still see the portrait. Make sure the picture is straight and then tape it into place. (Helpful hint: Use one piece of tape to secure the picture to the parchment paper and then use tape (as needed ) to tape the parchment paper to the pan. Make sure the parchment paper is as flat as possible because this will make your silhouette easier to see).
- Look at the silhouette and observe the shaded part — this is the area you will work on first. Look at the various curves and lines to get a sense for how you will need to shape your dough to fit these areas.
- Start with the chocolate cookie dough. Take a small amount of dough (a half teaspoon at most) and start shaping it to fit a shaded part of the portrait. The dough should be pressed or placed onto the pan at about 1/8″ – 1/4″ inch thick. The silhouette should be easy to see under the parchment paper, so press, shape or place dough exactly where the shaded parts are.
- When it comes to making thin lines, roll the dough into snake-like shapes. If you are making sharp edges or fine details, you can also use a snake-like shape to gently push in tight spaces and/or you can use a toothpick or knife to help push the dough where you need it to go.
- Continue using small amounts of dough to fill in the shaded part of the portrait little-by-little
- When all of the shaded parts are completed, look over your details to see what needs to be adjusted. Make those corrections as needed.
- Now place the cookie sheet in the refrigerator for about 20 minutes — this will harden the shaded parts and make it much easier to add the lighter areas in the next phase.
- By now the shaded parts of the silhouette will be firm and you can go ahead and repeat the process above, but filling in the lighter areas.
- Start with the areas that have fine detail first — this is because the chocolate dough is still cold and firm from being refrigerated and it will be easier to shape the sugar cookie dough into any tight spaces. Remember to use small amounts of dough at a time.
- Complete all of the light areas.
- Finally, fill in the spaces around the silhouette with the sugar cookie dough so that you have a uniform shaped cookie — you can make the overall cookie shape to be a square, an oval, or a rectangle depending on the portrait.
- Again, look over your details to see if they look as accurate as possible. You can always remove any cookie dough from areas that don’t look right and do that area over if needed. I did Elvis’s lips three times until it was “good enough.”
- Your portrait will have a bumpy appearance. If you still have any patience left you can use your warm hands to smooth out the worst of the bumps.
- Carefully remove all of the tape from the pan, as well as the original portrait underneath the parchment paper.
- Bake the cookie in a preheated oven at 400 degrees for about 8 minutes or until the edges start to turn light brown.
- Allow the cookie to cool completely.
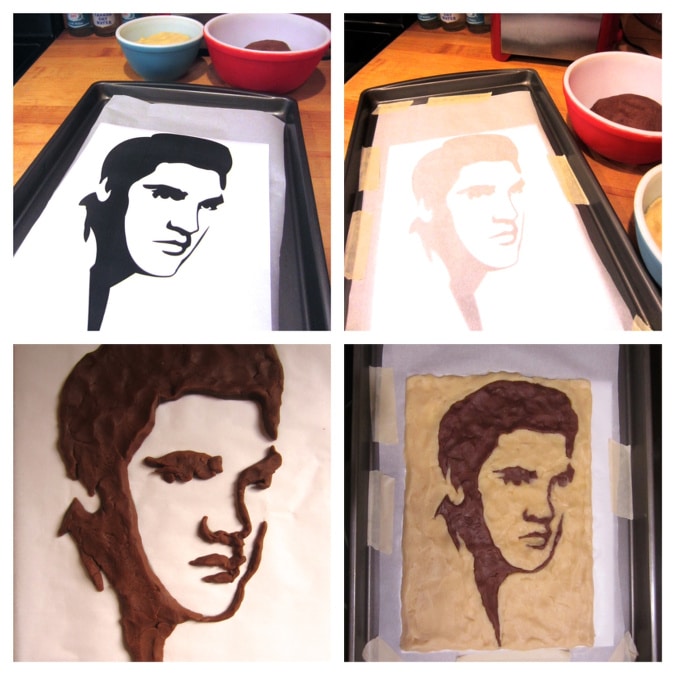
Steps in making a cookie portrait
Photo Credit : Bonnie Thomas